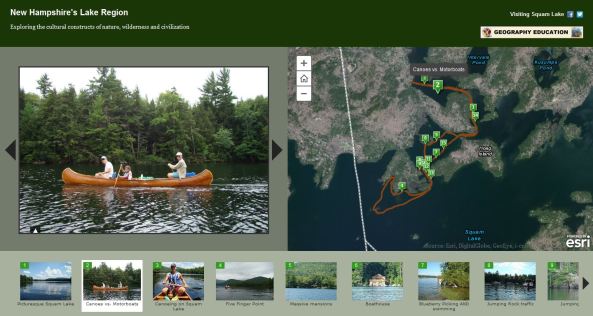
When I discuss environmental geography in my Introduction to Geography course, I begin with a discussion of the history though on nature, civilization and culture. I’ve shown pictures of the nature hikes and canoeing trips to tease out ideas about how my students think about wilderness and civilization and their role in both. Rather than simply show pictures as I did in years past, I decided to create a StoryMap Web application and let the map and the images work together in an interactive format.
Why? Mainly because mapping tools are changing how we can tell stories and share information.
So how did I make this story map?
-
I created .GPX files of my hikes and canoe trips. With a GPS enabled smartphone, you can use many apps (such as MotionX for iPhones and GPS Essentials for Android users) to record your tracks or store waypoints. A traditional handheld GPS receiver can also do the job.
-
I then uploaded these GPX files to ArcGIS online. I then saved that map with the basemap that I found most appropriate. Given that this map is all about nature and the environment, green seemed the best background color template as well as color for the pushpin markers. This finished map is what will be seen in the map portion of the WebApp.
-
I then shared that map publicly and also chose to create a WebApp (I selected the Map Tour template). I previously uploaded all of the pictures that I wanted to share to my Flickr account as a separate set (you could use Picasa or even Facebook). I gave all the images captions and descriptions that I would want in the WebApp.
-
I then geo-located all of my images (a combination of using GPS coordinates, eyeballing the map and guesswork) and arranged them in an order that I thought would best tell the story. I then shared the map online through my social media channels.
That’s it, but each of these 4 steps requires different technological tools and the entire project then is a synthesis of a diverse set of tools. So to recap, this is what you will need:
-
An ArcGIS account
-
GPS device with an app that records tracks
-
Photo-hosting service
-
Social media networks to share
I recently discovered how to hyperlink the text in the photo description. It isn’t widely announced by if you can code it, you can make it happen. Add this in the textbox (replacing the URL and TEXT):
<br><a href=”URL” style=”color:white” target=”_blank”>Description of Link</a>.
Bolded are the portions that you should or can replace to customize your hyperlink. The <br> at the beginning makes the hyperlink start on a new line so you can eliminate that portion if you wish.


Leave a comment